
Table of Contents
You've been there: the hardware works, the sensors are wired up, and somewhere inside main.py a print() is faithfully reporting voltage every second into a serial terminal that nobody will ever open again.
The gap between "working prototype" and "something you'd actually show someone" is often just a few hundred lines of web code - and on MicroPython, that's easier than you might expect.
This article walks you through building a live battery charge dashboard that runs entirely on an ESP32-C3 Super Mini. The device connects to your local Wi-Fi, hosts a small web page using Microdot, and serves real-time voltage, current, and power readings from an INA219 power monitor while a TP4056 charges an 18650 cell.
Any browser on the same network can open the page and watch the charge progress unfold.
The hardware is a simple, but useful circuit. The core lesson here is Microdot: how to think about routes, JSON APIs, and a minimal browser UI that polls the device.
These patterns apply to anything you'd wire to a micro-controller, like temperature sensors, fuel gauges, motion detectors, so even if battery monitoring isn't your use case, this structure is.
What You Will Build
The finished project is a single-page dashboard served directly from the ESP32-C3. It shows:
- Bus voltage (V) - measured by the INA219 on the battery side
- Charge current (mA) - derived from the INA219 shunt voltage (in series with battery)
- Power (mW) - computed as
V × mA - Last update time - so you can immediately see if the connection is stale
- Connection status indicator - a clear visual signal that the browser is actively receiving data
It is intentionally small. On microcontrollers, the fastest route to reliability is a small surface area: tiny payloads, tiny pages, and simple control flow.
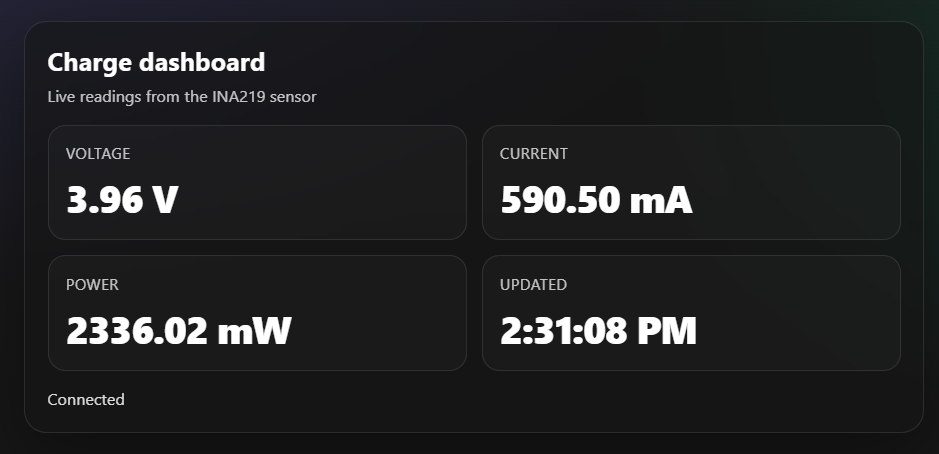
This is the running dashboard while charging a 18650 battery:
You won't find React, WebSockets, or authentication here - not because those are wrong, but because they distract from the architectural lesson.
Why Microdot?
Before diving into code, it's worth understanding why Microdot is the right tool here rather than, say, raw sockets or a stripped-down asyncio HTTP handler.
MicroPython already trims the Python standard library to fit in a few hundred kilobytes. Most full web frameworks - Flask or FastAPI - assume a runtime environment with considerably more headroom.
Microdot was designed specifically for constrained environments: it's small enough to live comfortably on an ESP32, and it gives you the ergonomics that make web code readable.
The mental model maps directly to Flask if you know it:
from microdot import Microdot

app = Microdot()

@app.route('/')
def index(request):
    return "Hello from ESP32", 200, {'Content-Type': 'text/plain'}

app.run(port=80)
That's it. An app object, route decorators, and sensible response handling. Microdot supports both sync and async handlers, which matters on ESP32 where uasyncio is your concurrency model and blocking the event loop kills Wi-Fi stability.
For this project, the full Microdot API surface we'll use is:
| Feature | Used for |
|---|---|
@app.route('/') |
Serving the HTML dashboard page |
@app.route('/api/metrics') |
JSON endpoint the browser polls |
Returning tuples (body, status, headers) |
Setting content type, handling errors |
Sync handlers (def) |
Keeping the project small and readable |
Nothing too exotic. That's the point.
System Overview
There are two parallel "flows" in this project, and keeping them separate in your head will save debugging time later.
Data flow:
INA219 (I²C) → ESP32-C3 (MicroPython) → Microdot routes → browser
Power and charge flow:
5V USB → TP4056 → 18650 cell
                 ↓
           INA219 (in series with battery leg)
                 ↓
           ESP32-C3 (powered from USB separately)
The INA219 sits in the battery leg - measuring what actually goes into the cell - while the ESP32 runs the web server and polls the sensor over I²C.
These are logically independent: the charger doesn't care about the web server, and the web server doesn't care about charging chemistry.
Hardware
You need four main components, plus a few passives and connectors.
- ESP32-C3 Super Mini: The ESP32-C3 Super Mini is a good choice here for several reasons: it's compact, supports Wi-Fi, runs MicroPython well, and its USB-C connector makes firmware updates painless.
- If you're new to the board, see Getting Started with ESP32-C3 SuperMini and MicroPython for the full setup walkthrough including flashing MicroPython and your first program.
- INA219: The INA219 is a current/power monitor that communicates over I²C. It measures two things directly:
- Bus voltage - the voltage on the load side of the shunt resistor (this is your battery voltage)
- Shunt voltage - the tiny voltage drop across the shunt resistor caused by current flowing through it
- From the shunt voltage and a known shunt resistance, you get current:
I = V_shunt / R_shunt.
- TP4056: The TP4056 is a single-cell Li-ion linear charger. Its charging algorithm follows two phases:
- Constant Current (CC): The charger delivers a fixed current (typically 1A on modules with a 1.2kΩ programming resistor) until the cell voltage reaches approximately 4.2V.
- Constant Voltage (CV): The charger holds 4.2V and the current tapers toward zero as the cell reaches full charge.
- 18650 Cell: Use a genuine cell from a reputable brand. Counterfeit 18650s with inflated capacity ratings are widespread and can be unsafe.
Safety
Li-ion cells store a significant amount of energy and can fail dangerously if mistreated. Pay attention, especially on a circuit you're building on a breadboard.
- Never charge unattended, especially during initial bring-up.
- Stop immediately if anything gets warm to the touch, smells unusual, swells, or hisses.
- Use a proper enclosure or at minimum keep the cell away from flammable materials on your bench.
- Don't short the battery terminals - ever.
- Don't let the cell discharge below ~2.5V.
Wiring Summary
In this build, the INA219 is placed in the battery leg (in series), so it measures the current actually going into (or coming out of) the cell:
TP4056 B+ ──── INA219 IN+ ──── INA219 IN- ──── Cell +
All grounds must be common (ESP32, INA219, and TP4056 share GND).
For reference, the full wiring diagram:

This is how it looks like on a breadboard:
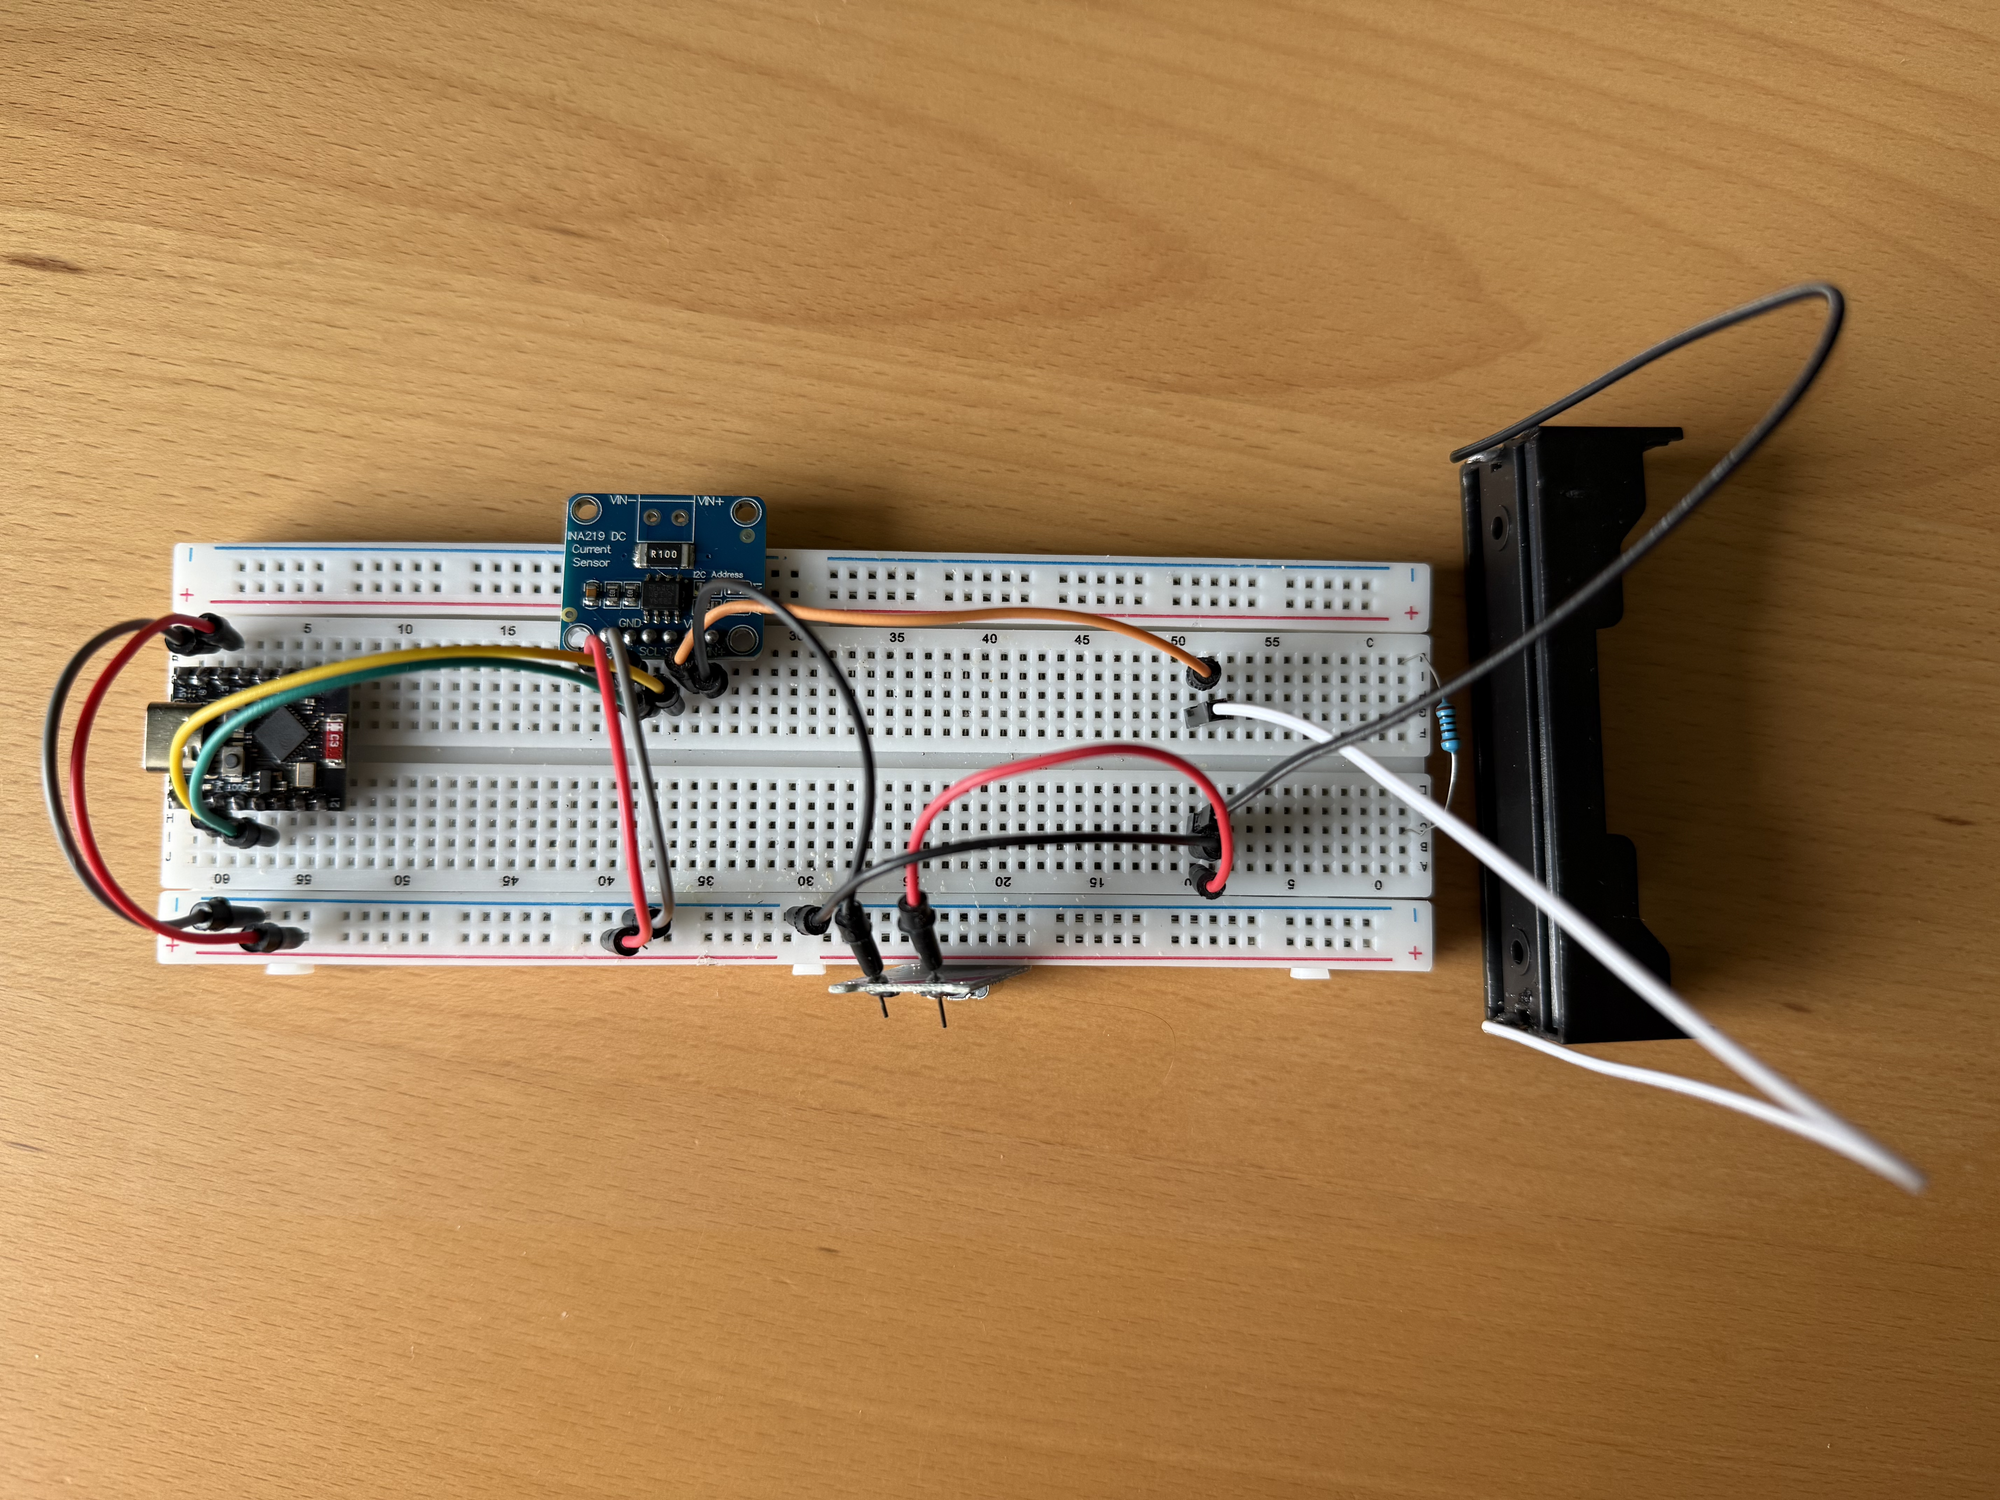
Note: You might see in this photo the TP4056 connections and think the polarity is reversed. I have made a mistake and soldered them reversed, in the picture the TP4046 B- is red and B+ is black.
Remember: The TP4056 B- should be to ground and TP4056 B+ goes to INA219 V+. Soldered them correctly, don' follow my example...
Software: Project Structure
The project is split into four files that live on the ESP32 filesystem:
├── main.py      # Wi-Fi connection + server startup
├── web.py       # Microdot app, routes, and inline HTML/JS
├── sensor.py    # INA219 init and read_metrics()
└── ina219.py    # Low-level INA219 driver
This structure makes the project maintainable. web.py owns the HTTP contract. sensor.py owns hardware access. Neither knows about the other's implementation details. The route handlers in web.py call sensor.py functions and translate the results into HTTP responses.
The article only shows only the important snippets below. The complete, working code (including the full HTML/CSS) lives in the repo:
First, you will need to install the microdot library, which for this case means copying the microdot.py from the repository to the device. Full install instructions are here:
sensor.py - Hardware Reads
The goal is: hide the INA219/I²C setup behind one function, and expose a single read_metrics() that returns a JSON-friendly dict. The sensor is initialized lazily (first call), which keeps main.py minimal.
_ina = None

def _get_ina219():
    global _ina
    if _ina is not None:
        return _ina

    # NOTE: Update pins to match your ESP32-C3 board wiring.
    i2c = I2C(0, scl=Pin(9), sda=Pin(8), freq=400_000)
    _ina = INA219(i2c=i2c, address=0x40)
    _ina.configure_32v_2a()
    return _ina

def read_metrics() -> dict:
    ina = _get_ina219()
    voltage_v = ina.bus_voltage_v()
    current_ma = ina.current_ma()
    power_mw = voltage_v * current_ma
    return {
        "voltage_v": voltage_v,
        "current_ma": current_ma,
        "power_mw": power_mw,
    }
A few deliberate choices here:
_inais module-level state. The INA219 is initialized once and reused across requests. Reinitializing I²C on every poll is wasted work and can cause intermittent bus issues.- The API adds a timestamp separately (in
web.py) sosensor.pystays focused on measurement, not transport/UI concerns.
web.py - Routes and Inline UI
There are only two routes: one serves the page, one serves JSON metrics. Microdot supports both sync and async def handlers; this project uses sync handlers to keep things simple.
from microdot import Microdot, Response
from sensor import read_metrics

app = Microdot()
Response.default_content_type = "text/html; charset=utf-8"

def _mono_ms() -> int:
    ticks_ms = getattr(time, "ticks_ms", None)
    return int(ticks_ms()) if ticks_ms else int(time.time() * 1000)

@app.route('/')
def index(_request):
    return HTML  # full HTML/CSS lives in the repo

@app.route('/api/metrics')
def api_metrics(_request):
    try:
        metrics = read_metrics()
        metrics["ts_ms"] = _mono_ms()
        return metrics
    except Exception:
        return {"error": "sensor_unavailable"}, 503
Notice how thin the handlers are. The API route is intentionally just “read the sensor, return JSON”, with a single stable error shape for the UI. That keeps the HTTP layer boring - which is exactly what you want on a microcontroller.
On the browser side, the core loop is a simple poll-and-render (full page in the repo):
async function poll() {
  const r = await fetch('/api/metrics', { cache: 'no-store' });
  if (!r.ok) throw new Error('HTTP ' + r.status);
  const d = await r.json();
  voltageEl.textContent = d.voltage_v.toFixed(2) + ' V';
  currentEl.textContent = d.current_ma.toFixed(2) + ' mA';
}
setInterval(poll, 1000);
main.py - Boot and Server Start
The startup sequence is short and deliberate: connect Wi‑Fi, initialize hardware, then start the server.
import time
import network
from web import app


_ENV = _read_dotenv()
WIFI_SSID = _ENV.get("WIFI_SSID", "")
WIFI_PASSWORD = _ENV.get("WIFI_PASSWORD", "")

def connect_wifi(ssid: str, password: str, timeout_s: int = 20) -> str:
    wlan = network.WLAN(network.STA_IF)
    wlan.active(True)
    if not wlan.isconnected():
        wlan.connect(ssid, password)
        start = time.time()
        while not wlan.isconnected():
            if time.time() - start > timeout_s:
                raise RuntimeError("Wi-Fi connect timeout")
            time.sleep(0.25)
    return wlan.ifconfig()[0]

def main() -> None:
    if not WIFI_SSID or not WIFI_PASSWORD:
        raise RuntimeError("Missing WIFI_SSID/WIFI_PASSWORD in .env")
    ip = connect_wifi(WIFI_SSID, WIFI_PASSWORD)
    print("Wi-Fi connected, IP:", ip)
    print("Open http://%s/ in a browser" % ip)
    app.run(port=80, debug=False)

main()
The startup sequence matters: connect Wi‑Fi first, then start the server.
Getting credentials from environment variables works for development, but if you want to ship this to a device someone else configures, a captive portal is the right next step - How to Build a Captive Portal in ESP32 with MicroPython covers exactly that.
What to Expect During a Charge Session
With the INA219 measuring battery-side current, a typical TP4056 session has a recognizable shape:
Constant Current phase (early):
- Current is relatively flat - usually 800–1000 mA on a standard 1A module, though weak USB supplies often limit this to 600–700 mA.
- Voltage climbs steadily from around 3.6–3.7V toward 4.2V.
- This phase lasts 1–2 hours depending on cell capacity and charge current.
Constant Voltage phase (late):
- Voltage plateaus near 4.2V.
- Current begins a gradual exponential decay.
- The TP4056 considers the cell full when current drops below approximately C/10 (for a 2000mAh cell, that's around 200 mA).
- This phase can last another hour.
Let' see the CC phase in action:

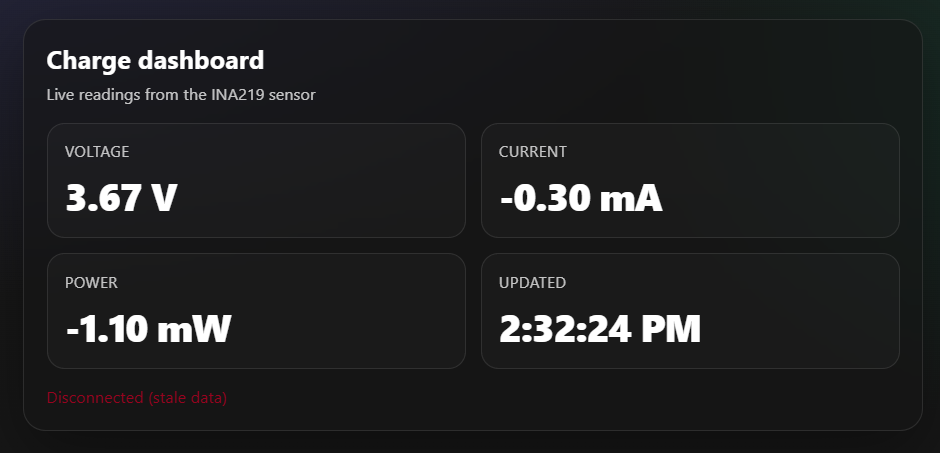
And if it gets disconnect for some reason:
Conclusion
Micro-controllers don’t need a “real web stack” to feel like a real product. With Microdot, you get the same clean mental model as Flask - routes, JSON, and a tiny UI - without dragging in heavy dependencies or complex infrastructure.
In this build you now have:
- A stable contract:
GET /api/metricsreturns a small JSON payload that any UI can consume. - A maintainable split: sensor logic stays in
sensor.py, HTTP logic stays inweb.py.
If you build something similar for a different sensor, keep the same pattern: one hardware module that returns a dict, one Microdot JSON route, and a minimal page that polls and renders.
Follow me on Twitter: https://twitter.com/DevAsService
Follow me on Instagram: https://www.instagram.com/devasservice/
Follow me on TikTok: https://www.tiktok.com/@devasservice
Follow me on YouTube: https://www.youtube.com/@DevAsService