
You unbox a small IoT device, plug it in, and… nothing.
No screen. No keyboard. No buttons that make any sense.
This is a familiar situation if you've ever worked with microcontrollers like the ESP32. The hardware is powerful, but the very first interaction is often awkward. At some point, the device needs to connect to your Wi-Fi network, and the classic question appears:
"How does a tiny device ask for Wi-Fi credentials?"
Hardcoding credentials works for quick experiments, but it breaks down in the real world, every deployment would require re-flashing the firmware. Serial consoles are fine for developers, not for users who don't have USB cables or the patience for terminal commands. Mobile apps add friction and maintenance overhead, requiring separate iOS and Android versions that need constant updates.
What you want instead is simple: power on the device, connect to it once from any phone or laptop, configure it through a familiar web interface, and never think about it again. No apps to install, no cables to find, no special tools required.
This is exactly where captive portals shine, they turn Wi-Fi provisioning into a one-time, friction-free experience that works on every platform.
What Is a Captive Portal?
If you've ever connected to Wi-Fi at a coffee shop, hotel, or airport, you've used a captive portal.
You join the network, and a web page automatically pops up asking you to log in or accept terms.
You didn't type a URL—the network guided you there by intercepting your browser traffic.
A captive portal on an embedded device works the same way:
- The device creates its own Wi-Fi network (acting as an access point)
- The user connects from their phone or laptop (no password needed)
- The device intercepts all internet requests using a DNS server
- A web page automatically opens showing the configuration form
- After submission, the device saves credentials and switches to normal Wi-Fi client mode
The beauty of this approach is that the ESP32 can handle everything on-device.
It acts as both an access point and a web server simultaneously, with no cloud services, external infrastructure, or internet connection required during setup. It's significantly simpler than building a companion mobile app (which requires maintaining iOS and Android versions) and far more user-friendly than hardcoded credentials or serial console configuration.
For IoT products, this is often the difference between "technically works" and "actually ships to customers."
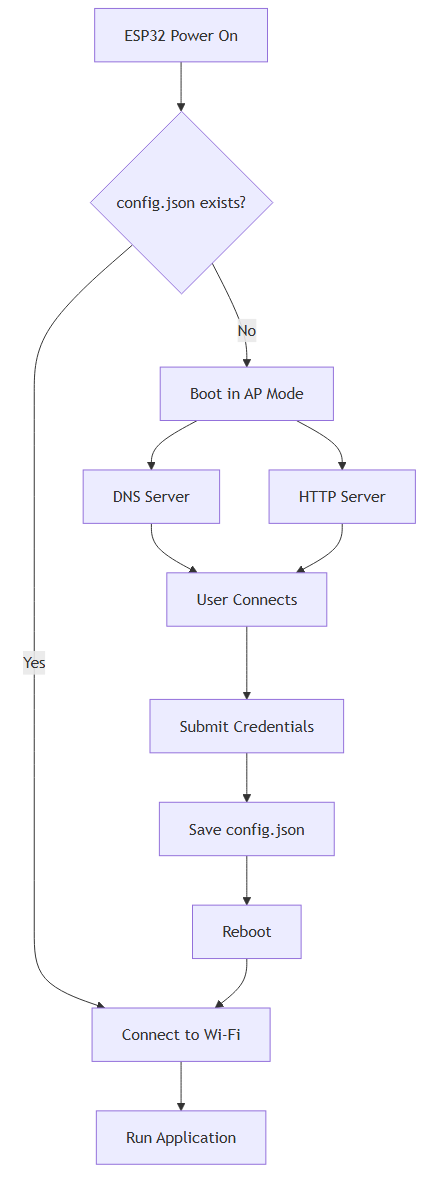
Architecture Overview
The device goes through two distinct phases: setup mode (captive portal) and normal operation (Wi-Fi client).
Setup Mode runs the first time you power on the device, or anytime no Wi-Fi configuration exists.
In this mode, the ESP32:
- Creates its own temporary Wi-Fi network
- Runs a DNS server that redirects all domains to itself
- Runs an HTTP server that serves the configuration page
- Saves user-submitted credentials to flash storage
Normal Operation begins after successful configuration.
In this mode, the ESP32:
- Disables the access point
- Connects to the user's Wi-Fi network as a client
- Runs your actual application (fetching data, controlling hardware, etc.)
The key decision happens at boot: does config.json exist? If yes, connect to Wi-Fi. If no, start the captive portal.
If you have already MicroPython installed on your ESP32, you are good to go and experiment with the following examples.
If not, see this guide for more detail on how to setup an ESP32 with MicroPython.
Step 1 - Create the Wi-Fi Access Point
The ESP32 creates its own Wi-Fi network using the built-in network module. This is the foundation of the entire captive portal, without the access point, users have no way to reach the configuration page.
The ESP32 has two Wi-Fi interfaces:
AP_IF(Access Point Interface) - Makes the ESP32 act like a routerSTA_IF(Station Interface) - Makes the ESP32 act like a Wi-Fi client
During setup mode, we use AP_IF to create a temporary network that users can join from their phones.
In your local project, create a new file wifi_ap.py:
import network

def start_access_point():
    ap = network.WLAN(network.AP_IF)
    ap.active(True)

    ap.config(
        essid="MyDevice-Setup",
        authmode=network.AUTH_OPEN
    )

    print("Access point active:", ap.active())
    print("AP IP address:", ap.ifconfig()[0])

    return ap
Once this runs, the ESP32 broadcasts a Wi-Fi network named "MyDevice-Setup" and assigns itself IP address 192.168.4.1. Any device that connects to this network can communicate with the ESP32 using this IP.
Why use an open network?
You'll notice we use AUTH_OPEN (no password). This might seem insecure, but it's actually the right choice for a temporary setup network:
- Better compatibility: Some devices have issues with WPA2 on captive portals
- Faster setup: Users don't need to type a password
- Auto-detection works better: Operating systems are more likely to show the "Sign in to network" popup on open networks
- Temporary by design: The AP only exists during initial setup and disappears once configured
The security risk is minimal because:
- The network only exists during the 1-2 minutes of setup
- The user is typically standing right next to the device
- Once configured, the AP shuts down completely
For production devices, you can add strategies like auto-disabling the AP after 10 minutes, or requiring a physical button press to re-enter setup mode.
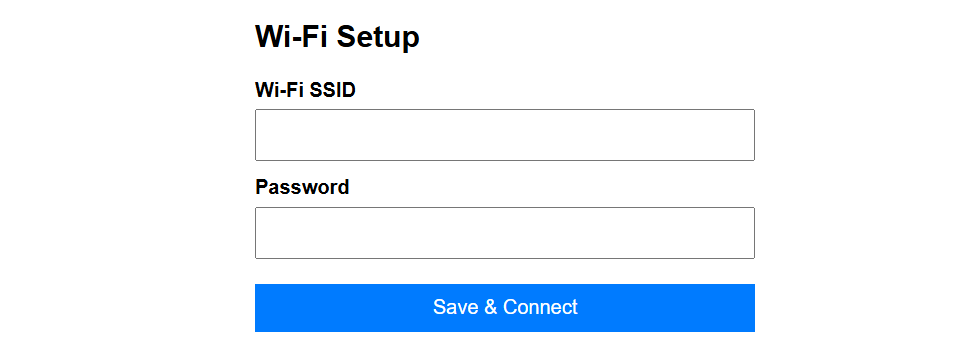
Step 2 - Build the HTML Setup Page
Before we create the HTTP server, let's build the setup page that users will see. This is the critical user-facing component, it needs to work flawlessly on every mobile device.
Design Principles for Captive Portal Pages:
- Mobile-first: Most users will access this from their phones
- Minimal dependencies: No external CSS/JS frameworks (we don't have internet!)
- Fast loading: Every byte travels over a slow access point connection
- Clear purpose: Users should immediately understand what to do
- Forgiving inputs: Don't assume users type perfectly
The page needs only two inputs: SSID and password. Everything else can be configured later through a different interface (if needed at all).
On your local project folder, create portal.html:
<!DOCTYPE html>
<html>
<head>
    <meta name="viewport" content="width=device-width, initial-scale=1">
    <title>Device Setup</title>
    <style>
        body {
            font-family: sans-serif;
            padding: 16px;
            max-width: 400px;
            margin: 0 auto;
        }
        h2 {
            margin-top: 0;
        }
        label {
            display: block;
            margin-top: 12px;
            font-weight: bold;
        }
        input, button {
            width: 100%;
            padding: 10px;
            margin-top: 6px;
            font-size: 16px;
            box-sizing: border-box;
        }
        button {
            margin-top: 20px;
            background: #007bff;
            color: white;
            border: none;
            cursor: pointer;
        }
        button:hover {
            background: #0056b3;
        }
    </style>
</head>
<body>
    <h2>Wi-Fi Setup</h2>

    <form method="POST" action="/save">
        <label>
            Wi-Fi SSID
            <input name="ssid" required>
        </label>

        <label>
            Password
            <input name="password" type="password">
        </label>

        <button type="submit">Save & Connect</button>
    </form>
</body>
</html>
Design notes:
viewportmeta tag ensures proper scaling on mobile devices- Inline CSS keeps everything in one file (no extra HTTP requests)
box-sizing: border-boxprevents input overflow issues- Large touch targets (10px padding) work better on phones
- Simple color scheme (#007bff) looks professional without complexity
Step 3 - Create HTTP Server with Form Handling
Now create an HTTP server that serves the HTML file and handles form submissions.
This is more complex than a typical web server because it needs to:
- Serve the same page for any URL - Operating systems make requests to various paths like
/generate_204,/hotspot-detect.html, etc. to detect captive portals - Handle form submissions - Parse POST data and save credentials
- Provide error feedback - Show clear messages when things go wrong
- Be resilient - The ESP32's networking stack is fragile, so we need careful error handling
The server handles both GET requests (show the form) and POST requests (save configuration).
On your local project folder, create http_server.py:
import socket
import json

def parse_form_data(body):
    """Parse URL-encoded form data"""
    data = {}
    pairs = body.split("&")
    for pair in pairs:
        if "=" in pair:
            key, value = pair.split("=", 1)
            # URL decode
            data[key] = value.replace("+", " ").replace("%40", "@")
    return data

def save_config(data):
    """Save Wi-Fi credentials to config.json"""
    if not data.get("ssid"):
        raise ValueError("SSID is required")

    config = {
        "ssid": data.get("ssid"),
        "password": data.get("password", ""),
    }

    with open("config.json", "w") as f:
        json.dump(config, f)

    print("Configuration saved:", config)

def start_http_server():
    addr = socket.getaddrinfo("0.0.0.0", 80)[0][-1]
    s = socket.socket()
    s.setsockopt(socket.SOL_SOCKET, socket.SO_REUSEADDR, 1)
    s.bind(addr)
    s.listen(1)

    print("HTTP server listening on port 80")

    while True:
        try:
            conn, addr = s.accept()
            request = conn.recv(2048).decode()

            if request.startswith("POST /save"):
                # Handle form submission
                body = request.split("\r\n\r\n", 1)[1]
                form_data = parse_form_data(body)
                save_config(form_data)

                response_body = """<!DOCTYPE html>
<html>
<head>
    <meta name="viewport" content="width=device-width, initial-scale=1">
    <title>Setup Complete</title>
    <style>
        body { font-family: sans-serif; padding: 16px; text-align: center; }
        h2 { color: #28a745; }
    </style>
</head>
<body>
    <h2>Configuration saved</h2>
    <p>Device will reboot and connect to Wi-Fi.</p>
    <p><small>You can close this window.</small></p>
</body>
</html>"""
            else:
                # Serve the setup page for any other request
                try:
                    with open("portal.html") as f:
                        response_body = f.read()
                except:
                    response_body = "<h1>Setup Page Not Found</h1><p>Please upload portal.html</p>"

            response = (
                "HTTP/1.1 200 OK\r\n"
                "Content-Type: text/html\r\n"
                "Connection: close\r\n\r\n"
                + response_body
            )

            conn.send(response.encode())

        except Exception as e:
            print("HTTP error:", e)
            try:
                error = f"<h2>Error</h2><p>{e}</p>"
                conn.send(
                    "HTTP/1.1 500 Internal Server Error\r\n"
                    "Content-Type: text/html\r\n"
                    "Connection: close\r\n\r\n"
                    .encode() + error.encode()
                )
            except:
                pass
        finally:
            try:
                conn.close()
            except:
                pass
Key implementation details:
Form parsing: The parse_form_data() function handles URL-encoded data (the format HTML forms use). We manually decode common characters like + (space) and %40 (@) since MicroPython doesn't have a built-in URL decoder.
File handling: The server reads portal.html from the filesystem. If the file is missing, it shows an error message instead of crashing, this helps with debugging during development.
Connection management: Connection: close is critical. MicroPython's socket implementation can leak memory with persistent connections. We explicitly close every connection, even in error cases, to prevent the ESP32 from running out of sockets.
Error handling: The triple-nested try/except blocks might look excessive, but they prevent the server from crashing when:
- A client disconnects mid-request
- The request is malformed
- The filesystem is corrupted
- Memory runs low
Response encoding: Notice we call .encode() when sending responses. MicroPython's socket.send() expects bytes, not strings.
Step 4 - Add DNS Redirection (The "Captive" Part)
To trigger the automatic "Sign in to network" popup on phones, we need a DNS server that redirects all domains to the ESP32's IP. This is the "captive" part of "captive portal", we're capturing all DNS requests.
How DNS redirection works:
When your phone connects to a new Wi-Fi network, it performs a "captive portal check" by trying to reach a known URL (like http://captive.apple.com on iOS or http://connectivitycheck.gstatic.com on Android).
Here's what happens:
- Phone asks DNS: "What's the IP address of captive.apple.com?"
- Our DNS server lies: "It's 192.168.4.1" (the ESP32's IP)
- Phone tries to load that page
- Our HTTP server responds with the setup page
- Phone realizes: "This isn't the real captive.apple.com, must be a captive portal!"
- Phone shows the "Sign in to network" popup
The key insight: we don't need to know which domain was requested. We just answer everything with our own IP address.
Create dns_server.py:
This article is for subscribers only
To continue reading this article, just register your email and we will send you access.
Subscribe NowAlready have an account? Sign In