
Have you ever wondered what time it is in Tokyo when it’s midnight in New York? Or wanted to see which parts of the world are basking in sunlight while others rest under the night sky?
In this article, we’ll create a Python application that generates a captivating visual map of day and night across the globe. Using real-time geocoding and astronomical data, the map shows exactly where the sun is shining at any given moment.
This project leverages several powerful Python libraries and APIs to produce an interactive day/night map that illustrates the Earth’s rotation and the relationship between time zones, geographic coordinates, and the sun’s position.
Whether you’re a data visualization enthusiast, a geography lover, or simply curious about how our planet’s rotation impacts different regions, this project offers both educational insights and striking visual appeal.
Requirements
Before starting, ensure you have Python 3.9 or higher installed (required for full zoneinfo support).
You’ll also need the following Python packages:
pip install requests pandas numpy matplotlib cartopy
Package Overview:
- requests: Handles HTTP requests to the Open-Meteo APIs (for geocoding and weather data).
- pandas: Used for data manipulation (minimal use in this project).
- numpy: Supports numerical operations.
- matplotlib: Creates the visualization and plots the map.
- cartopy: Provides geographic projections and map features, including the
Nightshadefeature to display day and night regions.
API Access
This project uses the Open-Meteo API, which is free and requires no API key. We’ll interact with two endpoints:
- Geocoding API – Converts location names into coordinates and retrieves timezones.
- Weather Forecast API – Provides sunrise and sunset times for specific locations.
Both APIs are publicly accessible and free to use, making it easy to integrate real-world astronomical data into your Python project.
If you want to learn how to use Open Meteo in other scenarios, check out my other blog posts:
https://developer-service.blog/how-to-build-a-free-weather-app-with-pyside6-and-open-meteo/
https://developer-service.blog/building-weather-history-story-cards-with-python-and-fastapi/
Step-by-Step Implementation
Step 1: Geocoding the Location
The first step is to transform a human-readable location name, such as "Berlin" or "New York", into precise geographic coordinates (latitude and longitude) and the corresponding timezone.
For this, we use the Open-Meteo Geocoding API, which allows us to look up locations and retrieve accurate coordinates and timezone data that we’ll need for calculating sunrise, sunset, and local time.
import requests
import pandas as pd
import numpy as np
import matplotlib.pyplot as plt
import cartopy.crs as ccrs
from cartopy.feature.nightshade import Nightshade
import datetime
from zoneinfo import ZoneInfo


# -----------------------------------------------
# 1. Get location from user and geocode it
# -----------------------------------------------
def get_coordinates(location_name):
    """Get coordinates and timezone for a location name using Open-Meteo Geocoding API."""
    base_url = "https://geocoding-api.open-meteo.com/v1/search"
    params = {
        "name": location_name,
        "count": 1,
        "language": "en"
    }
    try:
        response = requests.get(base_url, params=params, timeout=10)
        data = response.json()
        if "results" in data and len(data["results"]) > 0:
            result = data["results"][0]
            timezone = result.get("timezone", "UTC")
            return result["latitude"], result["longitude"], result.get("name", location_name), timezone
        else:
            return None, None, None, None
    except Exception as e:
        print(f"Error geocoding location: {e}")
        return None, None, None, None

# Ask user for location
location_name = input("Enter a location name (e.g., 'Berlin', 'New York', 'Tokyo'): ").strip()
if not location_name:
    location_name = "Berlin"  # Default location
    print(f"Using default location: {location_name}")

print(f"Searching for coordinates of '{location_name}'...")
LOCATION_LAT, LOCATION_LON, found_name, location_timezone = get_coordinates(location_name)

if LOCATION_LAT is None or LOCATION_LON is None:
    print(f"Error: Could not find coordinates for '{location_name}'")
    print("Please try a different location name.")
    exit(1)

print(f"Found: {found_name} at ({LOCATION_LAT}, {LOCATION_LON})")
print(f"Timezone: {location_timezone}")

# Ask for datetime (optional, defaults to current time)
date_input = input("Enter date/time (YYYY-MM-DD HH:MM:SS) or press Enter for current time: ").strip()
if date_input:
    try:
        DATE_TIME = datetime.datetime.strptime(date_input, "%Y-%m-%d %H:%M:%S")
    except ValueError:
        print("Invalid date format. Using current time.")
        DATE_TIME = datetime.datetime.now()
else:
    DATE_TIME = datetime.datetime.now()

print(f"Date/Time: {DATE_TIME}")
This gathers a location and a date/time from the user, then retrieve geographical and timezone information for that location.
It first prompts the user to enter a location name, defaulting to Berlin if none is provided. Using the Open-Meteo Geocoding API, it fetches the corresponding latitude, longitude, and timezone, handling cases where the location cannot be found or if the API call fails. This ensures that the script always has valid coordinates to work with for further processing.
After determining the location, the script asks the user for a specific date and time, allowing the user to either input a custom value or use the current system time. The input is validated and parsed; if the format is incorrect, the script defaults to the current time.
Finally, it prints out the resolved location, its coordinates, timezone, and the selected date/time.
Step 2: Fetching Sunrise and Sunset Data
With the location’s coordinates in hand, the next step is to retrieve the sunrise and sunset times for that specific location and date.
We accomplish this by querying the Open-Meteo Weather Forecast API, which provides daily astronomical data. Using the latitude, longitude, and timezone, the API returns precise sunrise and sunset times. This information allows us to determine whether it is currently day or night at the chosen location and will serve as the basis for our day/night map visualization.
# -------------------------------------------------------------------
# 2. Fetch sunrise and sunset for the specified location and date
# -------------------------------------------------------------------
print(f"Fetching sunrise and sunset times for {found_name} on {DATE_TIME.date()}...")
# Use the date from DATE_TIME to get sunrise/sunset for that specific date
date_str = DATE_TIME.strftime("%Y-%m-%d")
# Request with location's timezone (or let API auto-detect) instead of forcing UTC
# If we have timezone from geocoding, use it; otherwise API will auto-detect
timezone_param = location_timezone if location_timezone else "auto"
url = f"https://api.open-meteo.com/v1/forecast?latitude={LOCATION_LAT}&longitude={LOCATION_LON}&daily=sunrise,sunset&timezone={timezone_param}&start_date={date_str}&end_date={date_str}"
# Store original timezone in case API doesn't return it
original_timezone = location_timezone
time_status = "UNKNOWN"
try:
    resp = requests.get(url, timeout=10).json()
    sunrise = resp['daily']['sunrise'][0]
    sunset = resp['daily']['sunset'][0]

    # Get timezone from API response - this is the actual timezone for the location
    if 'timezone' in resp:
        location_timezone = resp['timezone']
        print(f"Location timezone from API: {location_timezone}")
    elif original_timezone:
        # Use timezone from geocoding if API didn't return one
        location_timezone = original_timezone
        print(f"Using timezone from geocoding: {location_timezone}")
    else:
        print("Warning: No timezone information available")

    # Parse sunrise/sunset times - API returns ISO format strings in the location's timezone
    # We need to parse them and convert to UTC for comparison
    sunrise_str = sunrise.replace('Z', '') if sunrise.endswith('Z') else sunrise
    sunset_str = sunset.replace('Z', '') if sunset.endswith('Z') else sunset

    # Parse as naive datetime first
    sunrise_dt_naive = datetime.datetime.fromisoformat(sunrise_str)
    sunset_dt_naive = datetime.datetime.fromisoformat(sunset_str)

    # Convert to UTC for comparison (we'll use the timezone to convert local times to UTC)
    tz_obj = ZoneInfo(location_timezone) if location_timezone else datetime.timezone.utc

    # Make sunrise/sunset timezone-aware in local timezone, then convert to UTC
    sunrise_dt = sunrise_dt_naive.replace(tzinfo=tz_obj).astimezone(datetime.timezone.utc)
    sunset_dt = sunset_dt_naive.replace(tzinfo=tz_obj).astimezone(datetime.timezone.utc)

    print(f"Sunrise: {sunrise} ({location_timezone})")
    print(f"Sunset: {sunset} ({location_timezone})")

    # Make DATE_TIME timezone-aware (assume UTC if not specified)
    if DATE_TIME.tzinfo is None:
        current_time_utc = DATE_TIME.replace(tzinfo=datetime.timezone.utc)
    else:
        current_time_utc = DATE_TIME.astimezone(datetime.timezone.utc)

    # Now all datetimes are timezone-aware, safe to compare
    is_daytime = sunrise_dt <= current_time_utc <= sunset_dt
    time_status = "DAYTIME" if is_daytime else "NIGHTTIME"
    print(f"At {DATE_TIME.strftime('%Y-%m-%d %H:%M:%S')} UTC, {found_name} is in {time_status}")
except Exception as e:
    print(f"Error fetching data: {e}")
    sunrise = None
    sunset = None
    time_status = "UNKNOWN"
This section of the code is responsible for fetching sunrise and sunset times for a specific location and date and determining whether it is currently daytime or nighttime at that location.
It first formats the date and constructs a request to the Open-Meteo API, including the latitude, longitude, and timezone obtained from the previous geocoding step. The API returns sunrise and sunset times for that date, typically as ISO-formatted strings in the location’s local timezone.
The code then carefully handles timezone conversion. It parses the sunrise and sunset strings into datetime objects, applies the correct timezone, and converts them to UTC to allow accurate comparison with the user-specified date/time. It also ensures that the input date/time is timezone-aware.
Finally, it checks whether the specified moment falls between sunrise and sunset, setting a time_status of "DAYTIME" or "NIGHTTIME" accordingly.
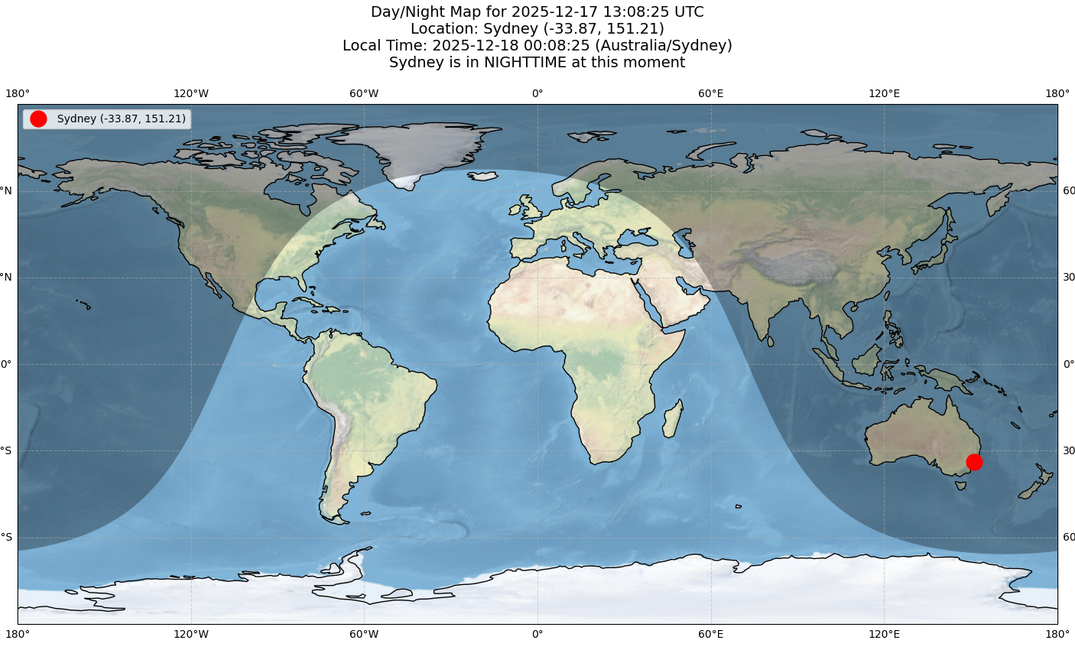
Step 3: Creating the Visual Map
Next, we’ll build a visual map of day and night using Cartopy, a powerful Python library for geospatial plotting.
The map includes several key features:
- Stock Image Background: A world map showing continents and oceans for context.
- Coastlines: Detailed outlines of coastlines to enhance geographic accuracy.
- Nightshade Overlay: A semi-transparent layer indicating regions currently in darkness. This feature automatically calculates shadows based on the Earth’s rotation and the sun’s position at the specified datetime.
- Location Marker: A red dot marking the user-specified location.
- Gridlines: Latitude and longitude lines with labels for easy reference.
- Title and Information: Displays UTC time, local time, coordinates, and whether the location is in daytime or nighttime.
This step brings all the data together into a dynamic and informative visualization that clearly shows which parts of the world are in light or shadow at a given moment.
Next, we’ll look at the code implementation to see how all these elements come together.
This article is for paid members only
To continue reading this article, upgrade your account to get full access.
Subscribe NowAlready have an account? Sign In