

Table of Contents
You've been there. CI is slow, the build server is running low on space, and df -h tells you the disk is 94% full - but not why.
You du -sh * your way through a few directories, mentally add up the numbers, and eventually find the culprit: six months of accumulated .venv folders, a Docker layer cache that got out of hand, or a node_modules directory that somehow outlived the project that created it.
It's not a disaster. It's just friction - the kind that adds up.
ncdu is a tool that makes this painless. It scans a directory tree, ranks everything by size, and lets you navigate and delete without ever leaving the terminal. If you're on a remote server or inside a container, it should be the first thing you reach for.
In this article, you'll build your own version in Python, called pydusk, using the textual TUI framework. It's a practical project - useful on its own - and a good way to get hands-on with Textual's core patterns: background workers, modal screens, reactive state, and a clean "state → render" loop.
What We're Building
pydusk is a keyboard-driven (with mouse support) terminal application that:
- Recursively scans a directory and calculates sizes
- Displays entries ranked largest-first with inline usage bars
- Lets you navigate the tree, enter sub-directories, and go back up
- Lets you delete files or directories with a confirmation prompt
- Runs as a CLI tool:
python pydusk.py ~/projects
Here's what it looks like in action:
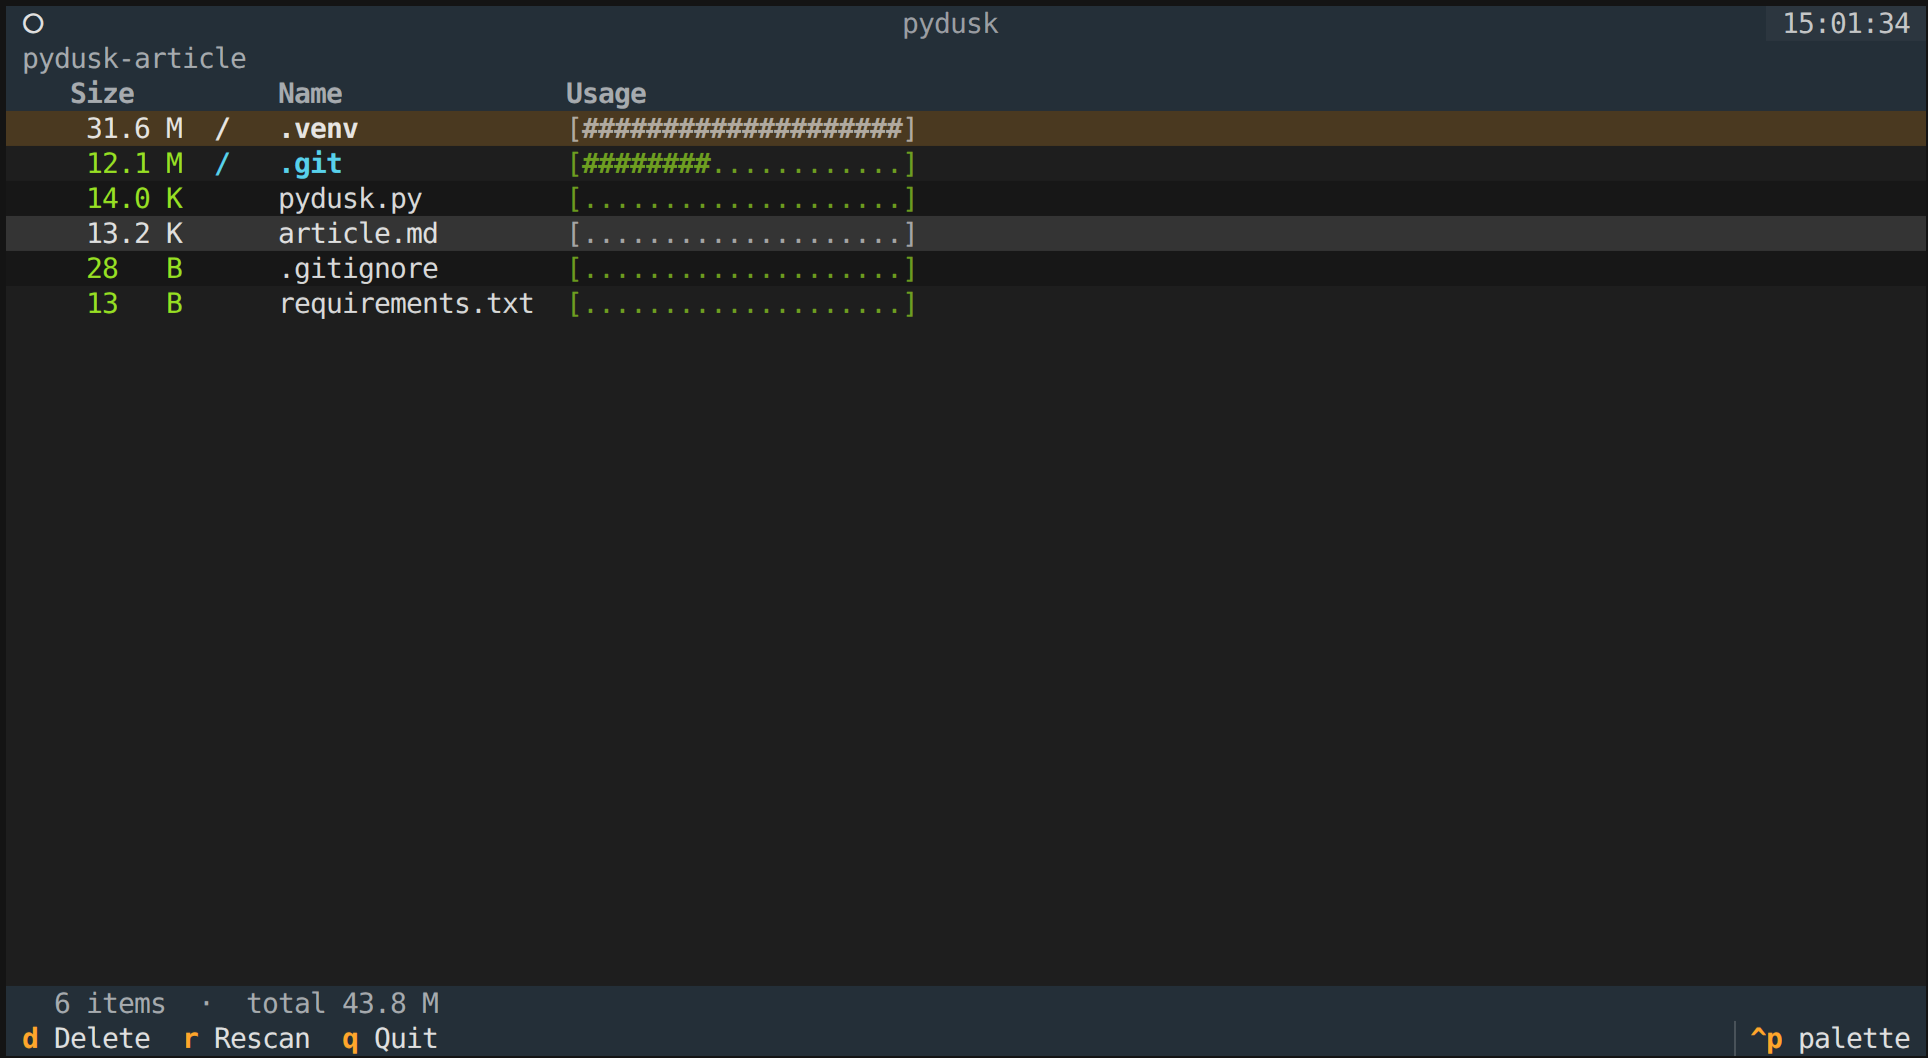
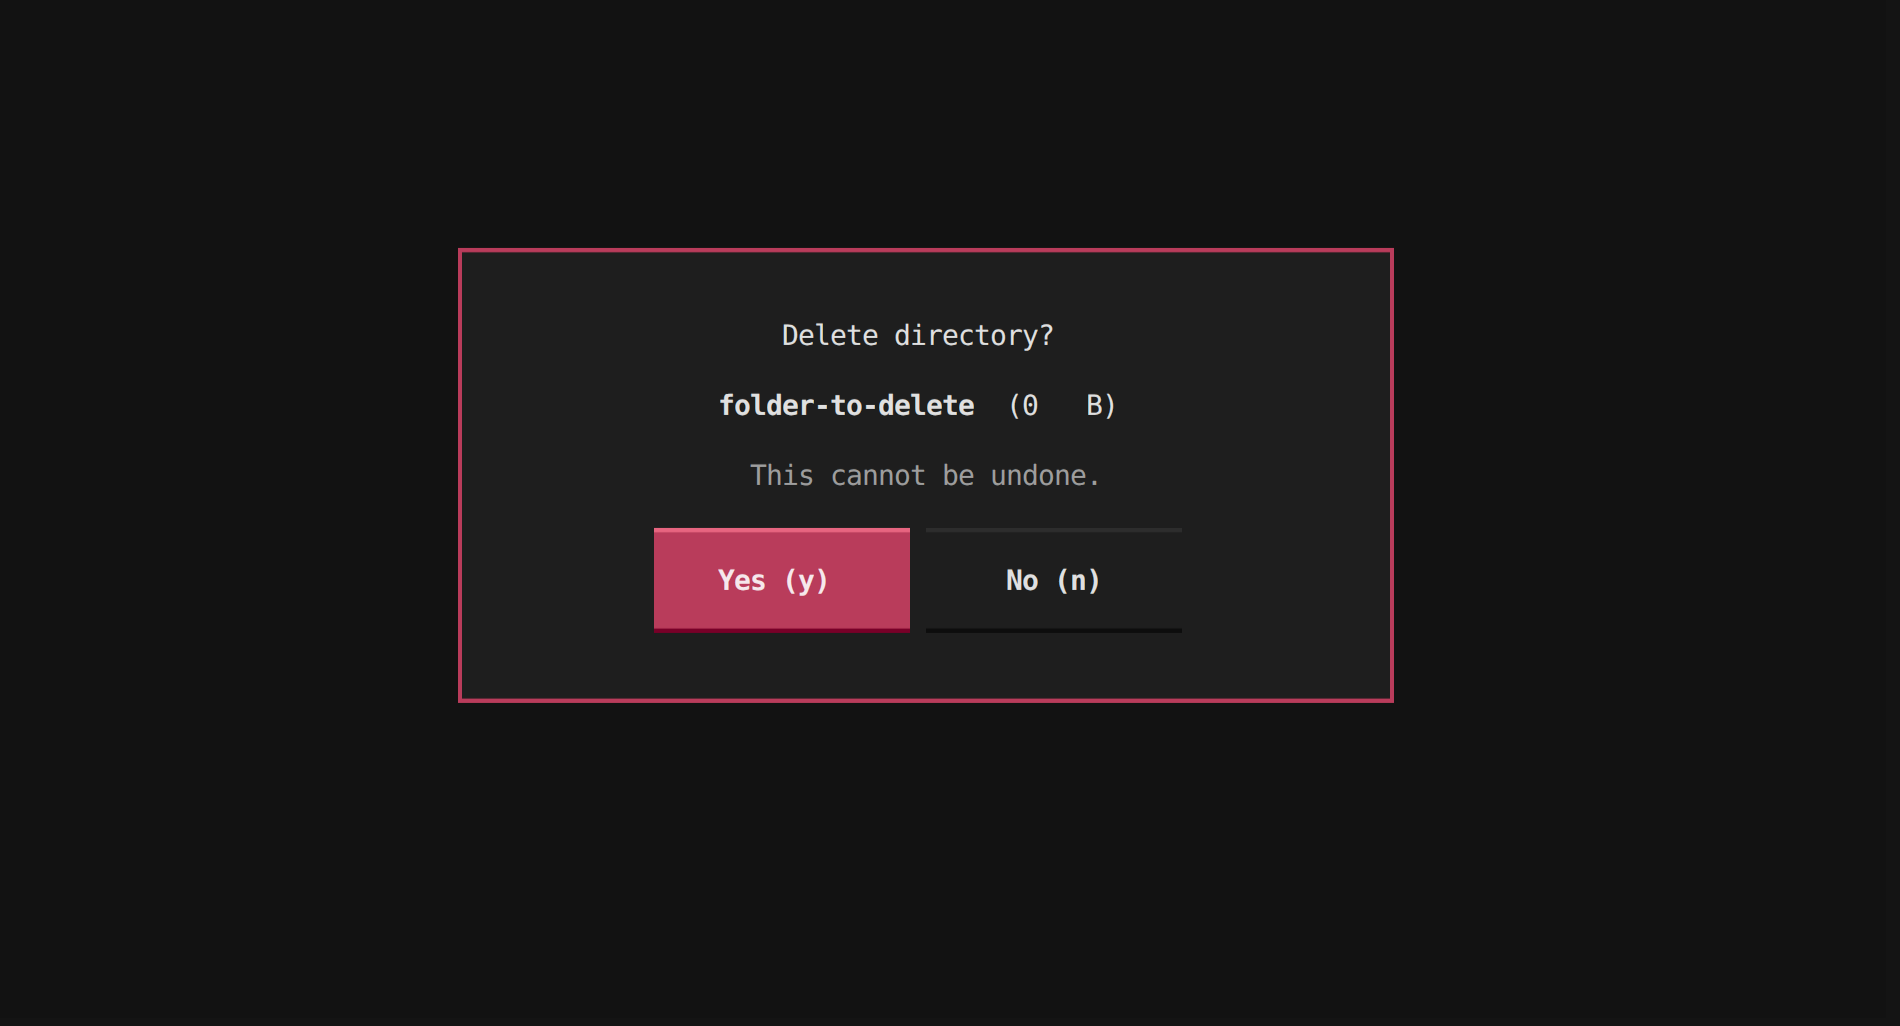
Confirmation modal to delete a file/directory:
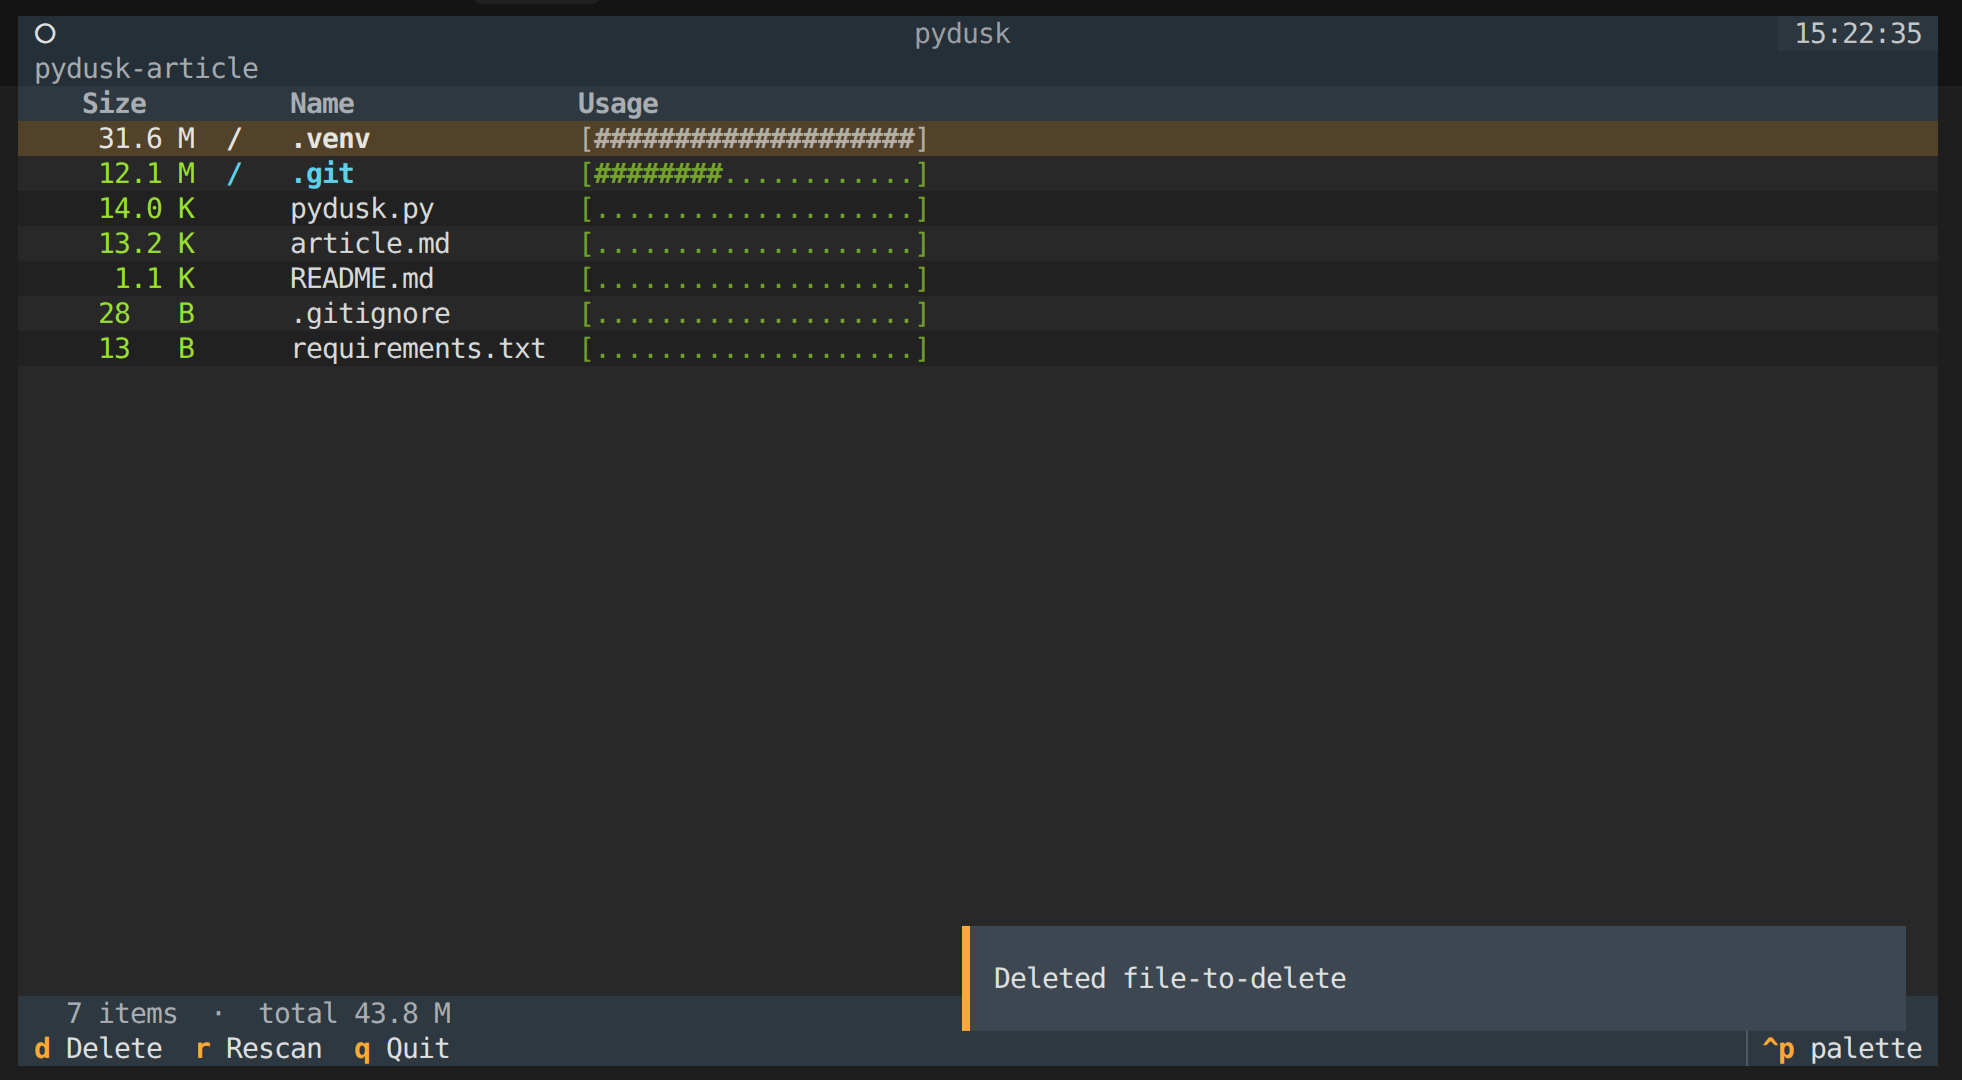
Notification after deleting a file/directory:
Architecture
pydusk is a single file, pydusk.py, with about 450 lines of Python.
It's split into three layers that are loosely coupled by design:
- the scanner knows nothing about the UI
- the UI knows nothing about the CLI
- and Typer glues everything together at the entry point.
That separation also means the scanner can be pulled out and used in other contexts without touching the TUI code.

Scanner layer - pure stdlib (os, pathlib, dataclasses). The scan() function walks the filesystem using os.scandir, which is faster than os.walk because it retrieves file metadata in the same syscall as the directory listing. It builds a tree of DiskEntry dataclasses, sorted largest-first at every level. Symlinks are skipped to avoid loops and permission errors are swallowed silently so the tool works on any real system.
Background worker - the scanner runs inside a Textual @work(thread=True) worker, keeping the UI responsive during large scans. Once the scan finishes, call_from_thread() safely hands the result back to the main thread to update the display.
TUI layer - a textual.App subclass called DuskApp. It holds a navigation stack (a plain Python list of DiskEntry objects) and renders it into a DataTable widget on every state change. The delete flow uses a ModalScreen subclass that returns a bool via dismiss() - Textual's idiomatic pattern for confirmation dialogs. All keyboard shortcuts are declared as BINDINGS.
CLI layer - a typer command that accepts an optional path argument, validates that it exists and is a directory, and hands it to DuskApp. Nothing more.
The only dependencies needed, from the requirements.txt:
textual
typer
Step 1 - The Data Model and Scanner
Start by deciding what a "node" in your tree looks like. You want something that can represent a file or a directory, carry its computed size, and (for directories) hold children.
You represent every file and directory as a DiskEntry dataclass:
from dataclasses import dataclass, field
from pathlib import Path

@dataclass
class DiskEntry:
    path: Path
    size: int
    is_dir: bool
    children: list["DiskEntry"] = field(default_factory=list)

    @property
    def name(self) -> str:
        return self.path.name or str(self.path)
The children field uses field(default_factory=list) instead of a mutable default, if you're not sure why that distinction matters, I covered it in detail in Python Trick: Using dataclasses with field(default_factory=...).
The scanner uses os.scandir, which is faster than os.walk because it avoids extra stat calls, it gets file metadata in the same syscall as the directory listing.
The goal is to return a DiskEntry where children is a list of more DiskEntry objects, sorted largest-first.
You build the entire tree in one recursive function, skipping symlinks (to avoid loops) and swallowing permission errors (because real systems always have unreadable paths):
def scan(path: Path) -> DiskEntry:
    path = path.resolve()
    children: list[DiskEntry] = []
    try:
        with os.scandir(path) as it:
            for entry in it:
                try:
                    ep = Path(entry.path)
                    if entry.is_symlink():
                        size = entry.stat(follow_symlinks=False).st_size
                        children.append(DiskEntry(ep, size, False))
                    elif entry.is_dir(follow_symlinks=False):
                        children.append(scan(ep))
                    else:
                        size = entry.stat(follow_symlinks=False).st_size
                        children.append(DiskEntry(ep, size, False))
                except (PermissionError, OSError):
                    pass
    except (PermissionError, OSError):
        pass

    children.sort(key=lambda e: e.size, reverse=True)
    total = sum(c.size for c in children)
    return DiskEntry(path, total, True, children)
See the full implementation in pydusk.py.
Step 2 - Building the TUI with Textual
Now you need a UI that can render a list and react to input. Textual works well here because it gives you a layout system, widgets like DataTable, a built-in footer for keybindings, and a clean event/message model.
The layout is intentionally minimal: a header, a breadcrumb bar, a DataTable for the list, and a status line.
This keeps the "disk usage" part front-and-center while still giving you enough UI to navigate comfortably:
from textual.app import App, ComposeResult
from textual.widgets import DataTable, Footer, Header, Static

class DuskApp(App):
    TITLE = "pydusk"

    BINDINGS = [
        Binding("up", "move_up", "Up", show=True, priority=True),
        Binding("down", "move_down", "Down", show=True, priority=True),
        Binding("right,enter", "enter_dir", "Enter", show=True, priority=True),
        Binding("left,backspace", "go_up", "Up dir", show=True, priority=True),
        Binding("d", "delete",  "Delete", show=True),
        Binding("r", "rescan",  "Rescan", show=True),
        Binding("q", "quit",    "Quit",   show=True),
    ]

    def compose(self) -> ComposeResult:
        yield Header(show_clock=True)
        yield Static("", id="breadcrumb")
        yield DataTable(cursor_type="row", zebra_stripes=True)
        yield Static("Scanning…", id="status")
        yield Footer()
Navigation state is a plain Python list used as a stack.
Each time you enter a directory you append the DiskEntry to _stack; going up pops from it.
That makes breadcrumb rendering trivial (it's just the stack joined with /) and keeps your state model dead simple:
def action_enter_dir(self) -> None:
    row_key = self._selected_row_key()
    if row_key == "__parent__":
        self.action_go_up()
        return
    entry = self._entry_for_row_key(row_key)
    if entry and entry.is_dir:
        self._stack = self._stack + [entry]
        self._refresh_table()

def action_go_up(self) -> None:
    if len(self._stack) > 1:
        came_from = self._stack[-1]
        self._stack = self._stack[:-1]
        self._refresh_table()
        self._restore_cursor_to_row_key(str(came_from.path))
If you prefer, you can also make the list clickable.
DataTable posts a RowSelected message when you select a row (including via mouse click).
You can handle that message and reuse the same navigation actions:
from textual import on
from textual.widgets import DataTable

@on(DataTable.RowSelected)
def _on_table_row_selected(self, event: DataTable.RowSelected) -> None:
    row_key = event.row_key.value
    if row_key == "__parent__":
        self.action_go_up()
        return

    entry = self._entry_for_row_key(row_key)
    if entry and entry.is_dir:
        self._stack = self._stack + [entry]
        self._refresh_table()
This keeps mouse and keyboard behavior consistent: clicking a directory enters it, and clicking .. goes up one level.
Step 3 - Non-Blocking Scan with @work
Scanning a large directory can take several seconds, and on big filesystems it can be minutes.
If you do that work on the main thread, the UI can't repaint or process input, which feels like a crash.
Textual solves this cleanly with the @work decorator, which runs a function in a background thread and lets you safely push results back to the UI thread:
from textual import work

@work(thread=True)
def _do_scan(self, path: Path) -> None:
    self._scanning = True
    entry = scan(path)                          # runs in a background thread
    self.call_from_thread(self._push_entry, entry)  # safely updates the UI
@work(thread=True) runs the method in a thread pool.
call_from_thread() schedules the UI update back on the main thread, which is similar to root.after() in Tkinter or loop.call_soon_threadsafe() in asyncio, but with a much nicer API.
Textual's worker system is a clean abstraction over Python threads, but it's worth understanding what's happening underneath. If you want to go deeper on threading and multiprocessing in Python, when to use each and what the tradeoffs are, I wrote a full breakdown in Concurrency in Python with Threading and Multiprocessing.
Step 4 - Rendering the Table
Each row in the DataTable is built from four columns: size, a directory indicator, the entry name, and a proportional bar.
The bar is rendered using rich.text.Text objects, which Textual accepts natively:
from rich.text import Text

BAR_WIDTH = 20

def bar(ratio: float, width: int = BAR_WIDTH) -> Text:
    filled = round(ratio * width)
    empty  = width - filled
    t = Text("[", style="dim green")
    t.append("#" * filled, style="bold green")
    t.append("." * empty,  style="dim green")
    t.append("]", style="dim green")
    return t
In _refresh_table, you calculate the ratio for each entry against the largest sibling, so the biggest item always gets a full bar.
That gives you a quick "shape" of disk usage without needing absolute numbers:
max_size = current.children[0].size or 1   # children are sorted largest-first

for entry in current.children:
    ratio = entry.size / max_size
    table.add_row(
        Text(fmt_size(entry.size), justify="right", style="green"),
        Text("/", style="bold cyan") if entry.is_dir else Text(" "),
        Text(entry.name, style="bold cyan" if entry.is_dir else "default"),
        bar(ratio),
        key=str(entry.path),   # used later to look up the selected entry
    )
The key parameter is important: it lets you map from a selected table row back to the original DiskEntry without maintaining a separate index.
Step 5 - Delete with Confirmation
Deleting from a TUI needs a confirmation step.
Textual's ModalScreen is the right tool.
It overlays the current screen and returns a value via dismiss(), which is perfect for a "Yes/No" flow:
from textual.screen import ModalScreen

class ConfirmDelete(ModalScreen[bool]):
    BINDINGS = [
        Binding("y", "yes", "Yes"),
        Binding("n,escape", "no", "No"),
    ]

    def action_yes(self) -> None:
        self.dismiss(True)

    def action_no(self) -> None:
        self.dismiss(False)
In the main app, you push the modal and handle the result in a callback:
def action_delete(self) -> None:
    entry = self._selected_entry()
    if entry:
        self.push_screen(ConfirmDelete(entry), self._handle_delete_result)

def _handle_delete_result(self, confirmed: bool) -> None:
    if not confirmed:
        return
    entry = self._selected_entry()
    try:
        shutil.rmtree(entry.path) if entry.is_dir else entry.path.unlink()
    except OSError as exc:
        self.notify(f"Delete failed: {exc}", severity="error")
        return
    # Update the in-memory tree — no need for a full rescan
    current = self._current()
    current.children = [c for c in current.children if c.path != entry.path]
    current.size = sum(c.size for c in current.children)
    self._refresh_table()
    self.notify(f"Deleted {entry.name}", severity="warning")
The last part is worth highlighting: after a delete, you update the in-memory DiskEntry tree directly instead of triggering a full disk rescan.
This keeps the UI snappy and avoids re-reading a potentially large directory.
Step 6 - CLI Entrypoint with Typer
Wrapping the app in a Typer command gives you argument parsing and --help for free:
import typer

cli = typer.Typer(help="Terminal disk usage analyzer.")

@cli.command()
def main(
    path: Path = typer.Argument(
        Path("."),
        help="Directory to analyze.",
        exists=True,
        file_okay=False,
        dir_okay=True,
        resolve_path=True,
    ),
) -> None:
    DuskApp(path).run()

if __name__ == "__main__":
    cli()
Examples of usage:
python pydusk.py ~/projects
python pydusk.py /var/log
python pydusk.py          # defaults to current directory
Conclusion
In about 450 lines of Python, you built a fully functional disk usage analyzer with a keyboard-driven TUI, mouse support, background scanning, and safe deletion.
Not bad for a single file with two dependencies.
There's plenty of room to take this further. Sorting modes would be a natural next step: toggle between size and name order with a single keypress. pathspec would let you add .gitignore-aware scanning, so virtual environments and build artefacts can be excluded upfront rather than deleted manually.
A --json flag to export the tree would make pydusk useful in scripts and CI pipelines, not just interactively. And color-coding entries by file type - like executables, archives, media - would make the display more scannable at a glance.
And if you want to take it all the way, turn pydusk into a proper pip-installable tool with a pyproject.toml, a build step, and a real release on PyPI, I walked through the full process in How to Build and Publish a Python Package to PyPI.
The full source code for the project is at github.com/nunombispo/pydusk-article.
Follow me on Twitter: https://twitter.com/DevAsService
Follow me on Instagram: https://www.instagram.com/devasservice/
Follow me on TikTok: https://www.tiktok.com/@devasservice
Follow me on YouTube: https://www.youtube.com/@DevAsService