GitHub Actions for Python Projects - Automate Your Workflow from Day One

You push your code. Your teammate pulls it. Nothing works. Sound familiar?
The "works on my machine" problem is one of the oldest frustrations in software development, and it doesn't go away on its own. The fix is automating your checks so every change gets validated the moment it hits your repository, not hours later when someone else is blocked.
That's CI/CD in a nutshell: run your tests, linting, and other quality checks automatically on every push or pull request, before anything breaks in production.
GitHub Actions is one of the best tools for this, especially if you're already hosting your code on GitHub. It's free for public repositories, requires zero external services, and lives right inside your project as a simple YAML file.
By the end of this tutorial, you'll have a working CI pipeline for a Python project, one that runs your tests automatically every time you push, catches issues early, and makes "it works on my machine" a thing of the past.
The full project is available on GitHub if you want to follow along.
Key Concepts
Before writing your first workflow, it helps to understand five terms that GitHub Actions uses everywhere. Once these click, the YAML syntax will make immediate sense.
Workflow: A YAML file that lives in .github/workflows/ in your repository. It defines what should happen, when it should happen, and how. You can have multiple workflows in a single project.
Event: The trigger that starts a workflow. Common examples are push (someone pushes a commit), pull_request (a PR is opened or updated), or schedule (a cron-based timer). You decide which events matter.
Job: A workflow is made up of one or more jobs. Each job runs independently on its own machine. By default, jobs run in parallel, though you can chain them if needed.
Step: The individual units inside a job. Each step is either a shell command you write (run: pytest) or a pre-built action you reference (uses: actions/checkout@v4). Steps run sequentially, top to bottom.
Runner: The virtual machine that executes a job. GitHub provides hosted runners for Linux, Windows, and macOS. For most Python projects, ubuntu-latest is the go-to choice.
Here's how they fit together:
Event (push)
  └── Workflow (ci.yml)
        └── Job (test)
              ├── Step: checkout code
              ├── Step: set up Python
              ├── Step: install dependencies
              └── Step: run pytest
Think of it as a chain reaction: an event fires, the workflow wakes up, jobs are assigned to runners, and steps execute one by one.
Your First Workflow: Running Tests on Every Push
Theory is useful, but nothing beats seeing it work. Let's build a minimal Python project and wire up a GitHub Actions workflow that runs your tests automatically on every push.
The Python Project
Start with a simple project structure:
my-project/
├── .github/
│   └── workflows/
│       └── ci.yml
├── calculator.py
├── test_calculator.py
└── requirements.txt
If you're building a Python package and want to publish it to PyPI, check out this guide - adding CI to it is the natural next step.
calculator.py contains a function to test:
def add(a, b):
    return a + b
test_calculator.py has the test:
from calculator import add

def test_add():
    assert add(2, 3) == 5
And requirements.txt lists your test dependency:
pytest
That's it. A real project is larger, but the workflow you're about to write scales to any size.
Creating the Workflow File
Create the file .github/workflows/ci.yml in your repository. The folder structure matters, GitHub only picks up workflows from that exact path.
Here's the complete workflow:
name: CI

on:
  push:
    branches:
      - main
  pull_request:
    branches:
      - main

jobs:
  test:
    runs-on: ubuntu-latest

    steps:
      - name: Checkout code
        uses: actions/checkout@v4

      - name: Set up Python
        uses: actions/setup-python@v5
        with:
          python-version: "3.12"

      - name: Install dependencies
        run: pip install -r requirements.txt

      - name: Run tests
        run: pytest
Line-by-Line Walkthrough
name: CI - The display name for this workflow. It shows up in the GitHub UI under the Actions tab.
on: - Defines what triggers the workflow. In this case, it runs on every push or pull_request targeting the main branch. If your default branch is master, update this accordingly.
jobs: - Everything underneath this key defines the jobs to run. Here there's just one: test.
runs-on: ubuntu-latest - Tells GitHub to spin up a fresh Ubuntu virtual machine for this job. It's fast, free, and the most common choice for Python projects.
uses: actions/checkout@v4 - This is a pre-built action maintained by GitHub. It clones your repository onto the runner, so the following steps have access to your code. Without this, the runner would have an empty machine.
uses: actions/setup-python@v5 - Another official action. It installs the specified Python version on the runner. The with: python-version: "3.12" block lets you pin the exact version you want.
run: pip install -r requirements.txt - A plain shell command. It installs your project's dependencies, in this case just pytest.
run: pytest - Runs your test suite. If any test fails, this step exits with a non-zero code, which marks the entire job as failed.
Pushing and Reading the Results
Commit the workflow file and push it to main:
git add .
git commit -m "Add CI workflow"
git push origin main
Head to your repository on GitHub and click the Actions tab. You'll see your workflow listed by name. Click into it to find the individual run, then drill into the test job to see each step expand with its output.
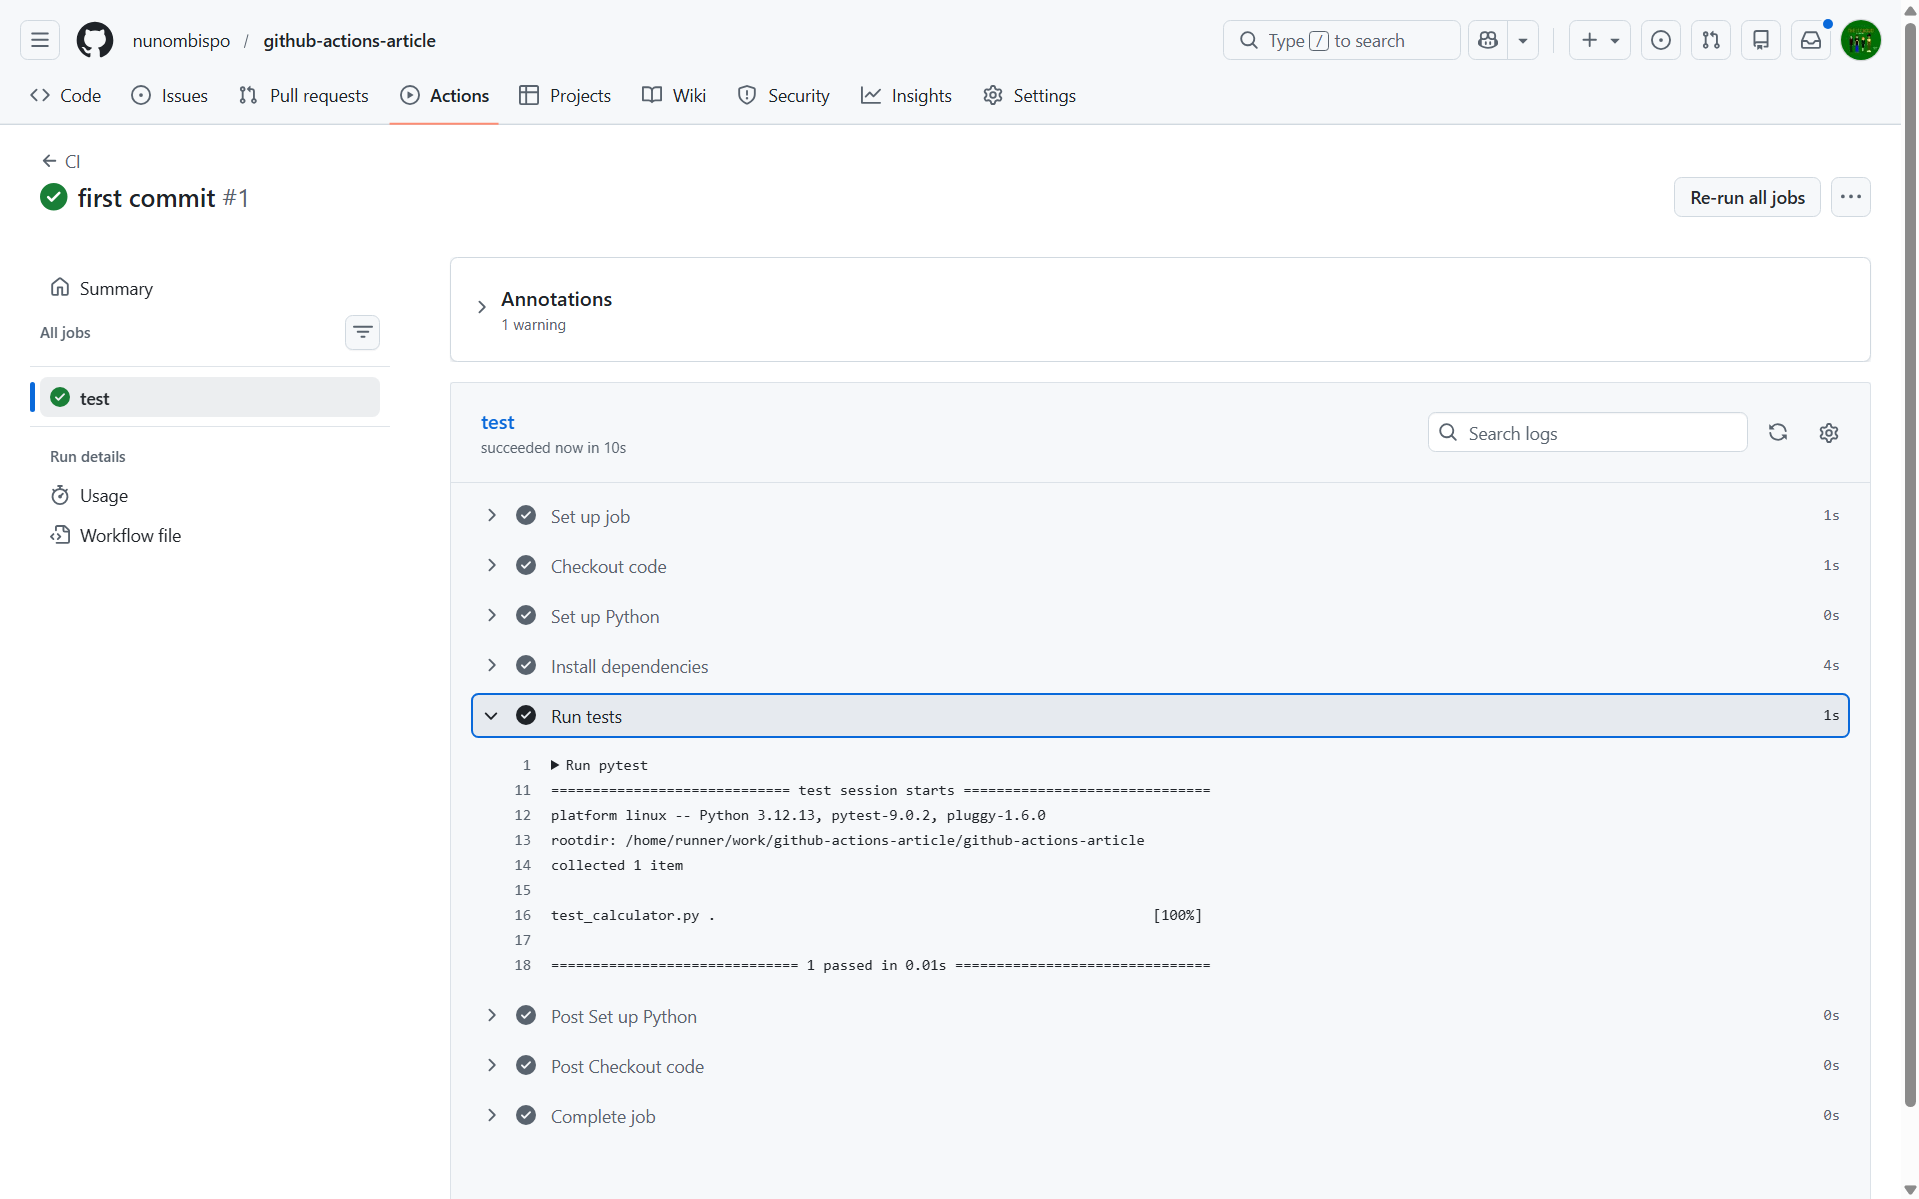
A green checkmark means everything passed. A red cross means something failed, click the failing step to read the exact error output, the same as you'd see in your local terminal.
From this point on, every push to main triggers the workflow automatically. You don't have to think about it, GitHub handles it for you.
You can find the complete project for this tutorial on GitHub: https://github.com/nunombispo/github-actions-article
Making It Smarter
A workflow that runs pytest is a great start. But with a few additions, you can catch more issues earlier and make your pipeline noticeably faster. Here's how to level up your CI without overcomplicating it.
Linting with ruff
Linting checks your code for style issues, unused imports, and common mistakes, the kind of things that slow down code review when left unchecked.
ruff is a fast Python linter written in Rust, and it's become the go-to choice for modern Python projects. Add it to your requirements.txt:
pytest
ruff
Then add a linting step to your workflow, right before pytest: